
Video Tutorial
Watch first if you want to follow along in real time while setting up VSCode for MicroPython on the Raspberry Pi Pico W.
Project Overview
Raspberry Pi Pico W + MicroPico + VSCode: In this tutorial, you set up Visual Studio Code with the MicroPico extension so you can write and run MicroPython on a Raspberry Pi Pico or Pico W, then verify it works with a blinking LED script.
Connecting to the Raspberry Pi Pico W in VSCode can help you write and debug code more efficiently, and improve your development workflow for embedded systems projects.
Note: The extension is now called MicroPico (as of 09-04-2023).
- Time: 15 to 30 minutes
- Skill level: Beginner
- What you will build: A working VSCode MicroPython workflow for Pico/Pico W, verified by blinking the onboard LED
Parts List
From ShillehTek
- No ShillehTek parts are required for this software setup.
External
- Raspberry Pi Pico or Raspberry Pi Pico W
- USB cable (data capable)
- Computer with Visual Studio Code installed
- Python 3.9 installed (required by the extension)
- MicroPython UF2 firmware for Pico/Pico W from https://micropython.org/download/
- MicroPico extension for VSCode (previously called Pico-Go / Pico-W-Go)
Note: After flashing MicroPython, unplug and replug the Pico (without holding BOOTSEL) so VSCode can find the device.
Step-by-Step Guide
Step 1 - Install MicroPython on the Pico / Pico W
Goal: Flash MicroPython firmware to your board so VSCode can run MicroPython code.
What to do:
- Plug the device into the computer while holding the BOOTSEL button.
- Go to https://micropython.org/download/ and download the latest version for the Pico or Pico W.
- Drag the UF2 file onto your Pico once it is done downloading (it should show up on your computer as RP1-RP2).
- Once it is done, the RP1-RP2 drive will disappear.
- Unplug and replug the Pico (without holding BOOTSEL). You need to do this so VSCode can find the device.
Expected result: The Pico restarts into MicroPython and is ready for VSCode to connect.
Step 2 - Install the MicroPico extension in VSCode
Goal: Add Pico MicroPython tooling to VSCode.
What to do:
- Make sure you have Python 3.9 installed on your computer (it is a requirement for the extension).
- Open Extensions in VSCode and install the extension by searching for “Pico”.
- Note: the extension was previously called Pico-Go and Pico-W-Go, and is now called MicroPico.
Expected result: MicroPico is installed and available in VSCode.
Step 3 - Create and configure your VSCode project
Goal: Prepare a local folder so VSCode provides MicroPython stubs, settings, and autocomplete.
What to do:
- Create a directory on your local computer, and open the empty directory in VSCode.
- Configure the environment by running
Pico-W-Go > Configure ProjectviaCtrl+Shift+P(or the equivalent on your platform) in the VS Code command palette. - This imports stubs for autocomplete and settings into your project folder. For autocomplete to work, the extension may prompt you to install additional recommended extensions.
Expected result: Your folder is configured for MicroPython development and ready for code.
Step 4 - Write and run a blinking LED test
Goal: Confirm VSCode can run MicroPython code on your Pico/Pico W.
What to do:
- Create a Python file in the directory and add the code below.
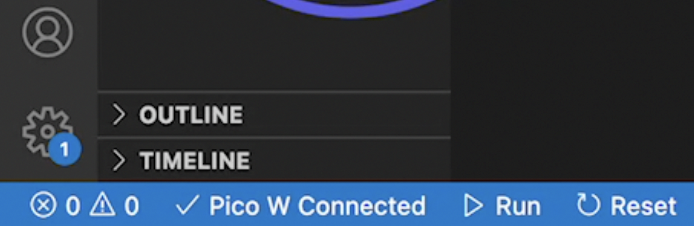
- Make sure the Pico is connected (shown at the bottom of the screen).
- Run the current file by right-clicking the file name and selecting Run current file.
Code:
from machine import Pin
from time import sleep

pin = Pin("LED", Pin.OUT)

while True:
    pin.toggle()
    sleep(1)
Expected result: The onboard LED starts blinking.
Conclusion
You set up VSCode for MicroPython development on a Raspberry Pi Pico or Pico W using the MicroPico extension, then validated the workflow by running a blinking LED script.
For more useful tips, the original video also links to the channel.
Want parts and tools for your next Pico project? Grab what you need from ShillehTek.com. If you want help setting up a workflow, shipping a prototype, or customizing an embedded build, check out our IoT consulting services.


.png?v=25000753014097803521767701813)

.png?v=68677308723310773341767701813)


